1.Docker UI
首先架設Docker UI,可協助基本Docker操作
docker run -d -p 9000:9000 --privileged -v /var/run/docker.sock:/var/run/docker.sock uifd/ui-for-docker
或安裝portainer(Docker UI)
參考連結:https://github.com/portainer/portainer
docker run -d -p 9000:9000 --name portainer_docker_UI --privileged --restart always -v /var/run/docker.sock:/var/run/docker.sock portainer/portainer
-p 9000:9000 可設定哪些IP可以連進Docker UI
進入http://{public_ip}:9000
檢視Docker UI
2.Postgresql
架設Postgresql,做為Gitlab資料庫,-p 5432:5432 部分可不用,其目的為開放port讓外部可連到Postgresql
docker run --name gitlab-postgresql -d \
-p 5432:5432 \
--env 'DB_NAME=gitlabhq_production' \
--env 'DB_USER=gitlab' --env 'DB_PASS=password' \
--env 'DB_EXTENSION=pg_trgm' \
--volume /srv/docker/gitlab/postgresql:/var/lib/postgresql \
sameersbn/postgresql:9.6
Docker UI > Containers
2.1 pgweb
提供Postgresql web ui管理(可不用安裝)
docker run -d -p 8081:8081 --link gitlab-postgresql:postgresql sosedoff/pgweb
Docker UI > Containers
進入
http://{public_ip}:8081
填入連線資訊後可看到相關資料
若第二步沒有指定-p 5432:5432 ,則把Host改為172.17.0.3(可由Docker UI > Containers >gitlab-postgresql IPAddress查詢)
連線資訊內容可從 Docker UI > Containers > gitlab-postgresql 的Environment欄位獲得
3.Redis
docker run --name gitlab-redis -d \
--volume /srv/docker/gitlab/redis:/var/lib/redis \
sameersbn/redis:latest
--volume /srv/docker/gitlab/redis:/var/lib/redis \
sameersbn/redis:latest
Docker UI > Containers
4.Gitlab
docker run --name gitlab -d \
--link gitlab-postgresql:postgresql --link gitlab-redis:redisio \
--publish 10022:22 --publish 10080:80 \
--env 'GITLAB_PORT=10080' --env 'GITLAB_SSH_PORT=10022' \
--env 'GITLAB_SECRETS_DB_KEY_BASE=long-and-random-alpha-numeric-string' \
--env 'GITLAB_SECRETS_SECRET_KEY_BASE=long-and-random-alpha-numeric-string' \
--env 'GITLAB_SECRETS_OTP_KEY_BASE=long-and-random-alpha-numeric-string' \
--volume /srv/docker/gitlab/gitlab:/home/git/data \
sameersbn/gitlab:8.15.2
Docker UI > Containers
進入http://{public_ip}:10080/
可看到Gitlab主控台
變更完root密碼後,就開始你的Gitlab吧!!
使用Docker UI觀看containers network
5.CI (Continuous integration, CI )
5.1 Docker架設GitLab Runner
docker run -d --name gitlab-runner-docker --restart always --link gitlab \
-v /var/run/docker.sock:/var/run/docker.sock \
-v /srv/gitlab-runner/config:/etc/gitlab-runner gitlab/gitlab-runner:latest
5.2 向GitLab註冊Runner
docker exec -it gitlab-runner-docker gitlab-runner register
註冊時需要填一些相關內容,請依照實際情況填寫
#Please enter the gitlab-ci coordinator URL (e.g. https://gitlab.com/ci):
http://{gitlab_ip}:{gitlab_port}/ci
#Please enter the gitlab-ci token for this runner:
{registration_token}
#Please enter the gitlab-ci description for this runner:
[44cf560ae74f]: desc
#Please enter the gitlab-ci tags for this runner (comma separated):
delpoy
#Registering runner... succeeded runner=X7yxKVsb
#Please enter the executor: docker, docker-ssh, parallels, shell, ssh, virtualbox, docker+machine, docker-ssh+machine:
docker
#Please enter the default Docker image (eg. ruby:2.1):
java:8-jdk
#Runner registered successfully. Feel free to start it, but if it's running already the config should be automatically reloaded!
5.3 Git專案Push後依照Pipelines進行build, test...
首先,專案根目錄要新增.gitlab-ci.yml
.gitlab-ci.yml檔案如何填寫可參考下方連結
以Gradle專案為例
.gitlab-ci.yml
# This template uses the java:8 docker image because there isn't any
# official Gradle image at this moment
#
# This is the Gradle build system for JVM applications
# https://gradle.org/
# https://github.com/gradle/gradle
image: java:8-jdk
# Make the gradle wrapper executable. This essentially downloads a copy of
# Gradle to build the project with.
# https://docs.gradle.org/current/userguide/gradle_wrapper.html
# It is expected that any modern gradle project has a wrapper
before_script:
- chmod +x gradlew
# We redirect the gradle user home using -g so that it caches the
# wrapper and dependencies.
# https://docs.gradle.org/current/userguide/gradle_command_line.html
#
# Unfortunately it also caches the build output so
# cleaning removes reminants of any cached builds.
# The assemble task actually builds the project.
# If it fails here, the tests can't run.
build:
stage: build
script:
- ./gradlew -g /cache/.gradle clean assemble
allow_failure: false
# Use the generated build output to run the tests.
test:
stage: test
script:
- ./gradlew -g /cache/.gradle check
新增後推上git,則會自動進入CI的流程
Pipelines > Status
6.CI常見問題
6.1 fatal: unable to access 'http://gitlab-ci-token:xxxxxxxxxxxxxxxxxxxx@localhost:10080/project/test-ci.git/': Failed to connect to localhost port 10080: Connection refused
解決辦法:
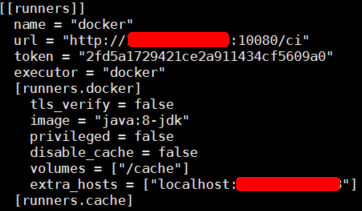
進入gitlab-ci Runner的config file修改
5.1節中有介紹執行gitlab-ci Runner,其中已指定config文件之處"/srv/gitlab-runner/config"
於本機終端機進入config.toml
vim /srv/gitlab-runner/config/config.toml
並加入extra_host
[runners.docker]
extra_hosts = ["localhost:{gitlab_ip}"]
CI重跑即可
6.2 ./gradlew: Permission denied
.gitlab-ci.yml中加入- chmod +x gradlew
before_script:
- chmod +x gradlew
CI重跑即可
6.3 Error: Could not find or load main class org.gradle.wrapper.GradleWrapperMain
出現此種狀況,只要將gradle也加入Git內,並Push上去即可
參考資料:
sameersbn/gitlab: https://hub.docker.com/r/sameersbn/gitlab/


網誌管理員已經移除這則留言。
回覆刪除